⚠️ Important: Only Yealink desk phones that are supported by Dialpad will work with this setup. Please refer to Dialpad’s list of supported devices or check with support@untangled.com.au before proceeding.
Updated 15 April 2025
This guide walks you through configuring Yealink SIP phones with Dialpad’s auto-provisioning system. You can configure the device either directly from the desk phone or via the Yealink GUI / Web Configuration Portal.
Steps:
2. Add auto provision URL on Yealink Deskphone or GUI
3. Complete Dialpad Activation
1. Enable yealink_phones SKU on user's profile via Dialpad support chat or call.
Once added to the Dialpad profile, go to Dialpad.com/officesettings > Deskphones > User Phones or Room Phones if you click on Add a User / Room Phone you will see these options

2. Add auto provision URL on Yealink Deskphone or GUI
2.1 Option 1: Configure the physical deskphone via the Phone Menu
-
Press the Menu button on the Yealink desk phone.
-
Go to Settings (3).
-
Select Advanced Settings (2).
-
Enter the admin password (default is
admin) and press OK.
-
-
Scroll to Auto-Provision (4).
-
Enter the Provisioning URL:
https://prov.dialpad.com -
When prompted "Provision now?", select OK.
-
The device will begin provisioning and updating firmware if needed.
- Go to Step 3. Complete Dialpad Activation
2.2 Option 2: Configure via the Yealink GUI/ Web Interface
- On the phone, go to Menu > Status > IPv4 to find the device’s IP address.
- Enter the IP address in your web browser (e.g.,
http://192.168.1.10). - You may need to click "Advanced" > "Proceed" if your browser flags it as unsafe.
- Log in using:
- Username:
admin Password:admin
- Username:
- (Recommended) Change the admin password for security:
- Navigate to Security > Password.
- Go to Settings > Auto Provision and enter the following URL in the Server URL field:
https://prov.dialpad.com
- Click Confirm to save changes.
- Navigate to Settings > Upgrade, then click Reboot.
- The device will reboot and auto-provision with Dialpad’s firmware.
- Go to Step 3. Complete Dialpad Activation
3. Complete Dialpad Activation
-
Open your web browser and head to: www.dialpad.com/officesettings
-
In the left panel click on Deskphones
-
To provision the Yealink deskphone to a User
- Click on User Phones > Add a User Phone
- Click on Yealink Phone
- Enter a name for the deskphone
- And in Who is this phone for? Find a user from your Dialpad team to assign the phone

- Click on Next
-
You’ll be given a 6-digit activation code — keep this handy!
-
-
On the Yealink desk phone, press the Dialpad Activate button.
-
Enter the activation code when prompted.
-
The phone will register and restart a couple of times (this is normal).
-
Once the phone finishes restarting, you’re all set!
-
Test to ensure you are able to make and receive calls.
-
-
To provision the Yealink deskphone as a Room Phone
- Click on Room Phones > Add a User Phone
- Click on Yealink Phone
- Enter a new name for your phone
- Click on Next and you'll be assigned a new number for the room phone
- Click on Confirm
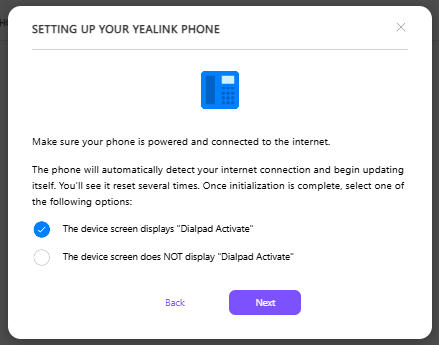
- Select The device screen displays "Dialpad Activate"
-
-
- Click on Next
- You’ll be given a 4-digit activation code — keep this handy!
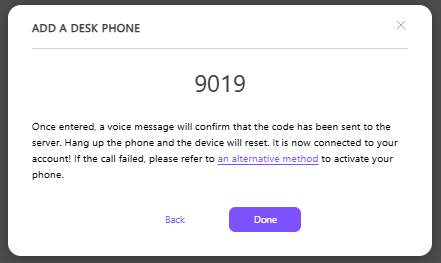
-
On the Yealink desk phone, press the Dialpad Activate button.
- Enter the activation code when prompted.
-
The phone will register and restart a couple of times (this is normal).
-
Once the phone finishes restarting, you’re all set!
-
Test to ensure you are able to make and receive calls.
What's the difference between a User and a Room Phone?
🧑💻 User Deskphone
-
Assigned to a specific user (e.g., John Smith)
-
Rings when that user receives a call
-
Shows that user’s caller ID on outbound calls, or can be set to main or department phone number.
-
Ideal for individual employees at a desk or in a private office
- Tied to a user license that allows the user to also access Dialpad via the desktop and web app
Example Use Case:
An account manager has a deskphone at their workstation that’s linked directly to their personal Dialpad account.
🏢 Room Deskphone
-
Shared phone not tied to a specific person
-
Assigned to a Department, Main Line, or Shared Space (like a conference room or reception)
-
Great for general access areas where multiple people might use the phone
-
Outbound caller ID is usually the department or main company number
- Is NOT tied to a user license, access is limited to only the physical phone
Example Use Case:
A Yealink phone placed in a meeting room or front desk area where different staff members can use it to place and receive calls.
Still having problems?
If you need more assistance, call or text us on 0480 006 410 or email support@untangled.com.au